
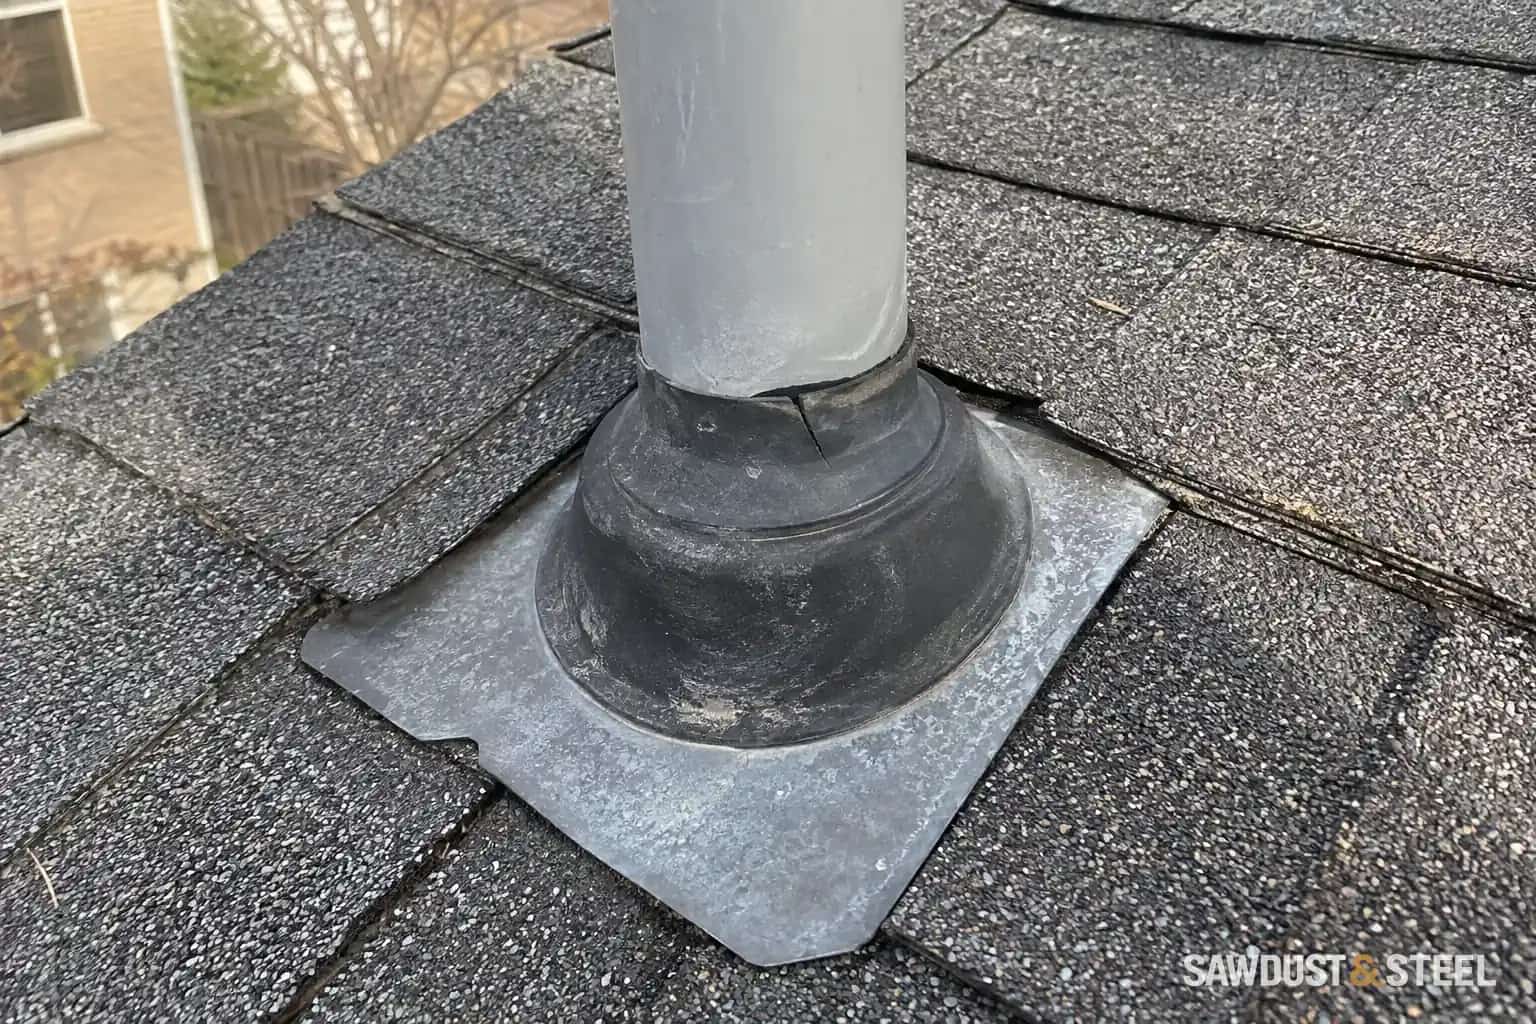
The brown mark is almost directly beneath the pipe on the roof. That makes the pipe flashing a sensible place to investigate, but it is not a completed diagnosis. Water can travel before it reaches the ceiling, and the pipe itself has a different job from the collar around it.
Deal with active water first
Keep people away from sagging ceilings and water near electrical equipment. Arrange urgent help for ongoing leakage or visible instability. Do not puncture a swollen ceiling, enter a wet attic or climb onto the roof to improve the photograph. Contain minor drips only where that can be done safely without standing under damaged material.
IKO's leak-finding guide explains that the visible outlet can be away from the original entry point and that plumbing or condensation can resemble a roof leak. Give the trades the pattern before committing to one repair.
Keep a short timing log
Record when the stain becomes wet: during rain, after wind-driven rain, during thaw, in a cold spell or around plumbing use. Note whether it dries between events and whether a recent roof or plumbing change preceded it. Photograph the first wet location when safely visible, not only the final spread across the paint.
Do not run fixtures repeatedly or spray the roof yourself to force a result. A controlled professional test may be appropriate, but indiscriminate water can enlarge damage and confuse the evidence. Existing observations, model records and accessible photographs are a useful starting point.
| Pattern | Useful investigation |
|---|---|
| Rain-related wetting | Roof penetration, surrounding covering and other uphill details |
| Plumbing-use association | Relevant pipework and joints |
| Cold-weather moisture without rain | Condensation and air leakage conditions |
| Persistent spread or sagging | Urgent damage and safety assessment |
Name the two separate components
The plumbing vent pipe serves the drainage system. The roof flashing manages rain around the hole where that pipe crosses the roof. IKO's flashing guide describes pipe flashing as a distinct roof detail integrated with the covering. A bead smeared around the visible pipe is not evidence that the whole assembly is sound.
Ask the roofer to inspect the collar or boot, surrounding shingles, flashing laps, fasteners and the accessible substrate. Ask the plumber to assess the relevant pipe and joints where the evidence points there. A roof repair invoice should identify what failed rather than simply saying 'sealed vent'.
Ask for wide photographs as well as close-ups
A useful report shows which penetration was inspected and how it sits within the roof plane. A close photograph of a cracked collar may be convincing, but the wider view establishes location and neighbouring details. Where accessible, pair it with an interior view showing the observed water path.
If there are several similar pipes, label them by roof area or room. Save the photos with the repair record. That prevents a later contractor receiving a folder of nearly identical black collars and guessing which one was changed last year.
Match the repair to the existing roof
The replacement flashing must suit the pipe, roof covering, slope and installation method. Surrounding brittle or damaged shingles may need replacement to make the repair properly. Ask how the installer will achieve the required integration without relying on a surface patch as the whole detail.
Where the roof is near renewal, compare a durable local repair with the broader reroof scope. The roof warning-sign guide helps separate an isolated penetration problem from widespread deterioration. A single leaking collar does not automatically justify a whole roof, but the surrounding condition matters to what repair is practical.
Check the concealed damage too
Stopping entry is the first step. Wet insulation, damaged sheathing or affected interior finishes may need their own assessment and drying or replacement plan. Do not immediately repaint an active stain and use fresh paint as the completion check. The ceiling-stain guide covers the finish stage after the source is resolved.
If the pattern suggests winter condensation, use the attic condensation comparison. Moisture on cold surfaces can require a different correction from replacing a pipe boot, even when the stain appears nearby.
Confirm the original symptom has stopped
Keep the repair photographs, named parts and any follow-up instructions. Observe the area through the weather or ordinary use associated with the original leak, without manufacturing another flood test. Report renewed wetting promptly with the same location and timing record. The successful repair explains the water path and stops it; it does not merely make the nearest pipe look freshly sealed.